"Life is brought down to the basics: if you are warm, regular, healthy, not thirsty or hungry, then you are not on a mountain... Climbing at altitude is like hitting your head against a brick wall - it's great when you stop."

Chris Darwin

Reel Rock 2011

Reel Rock 2011 poster. Credit: Sender Films,  Shot on 2012-02-29 Photo taken.Licensed under: Public Domain.

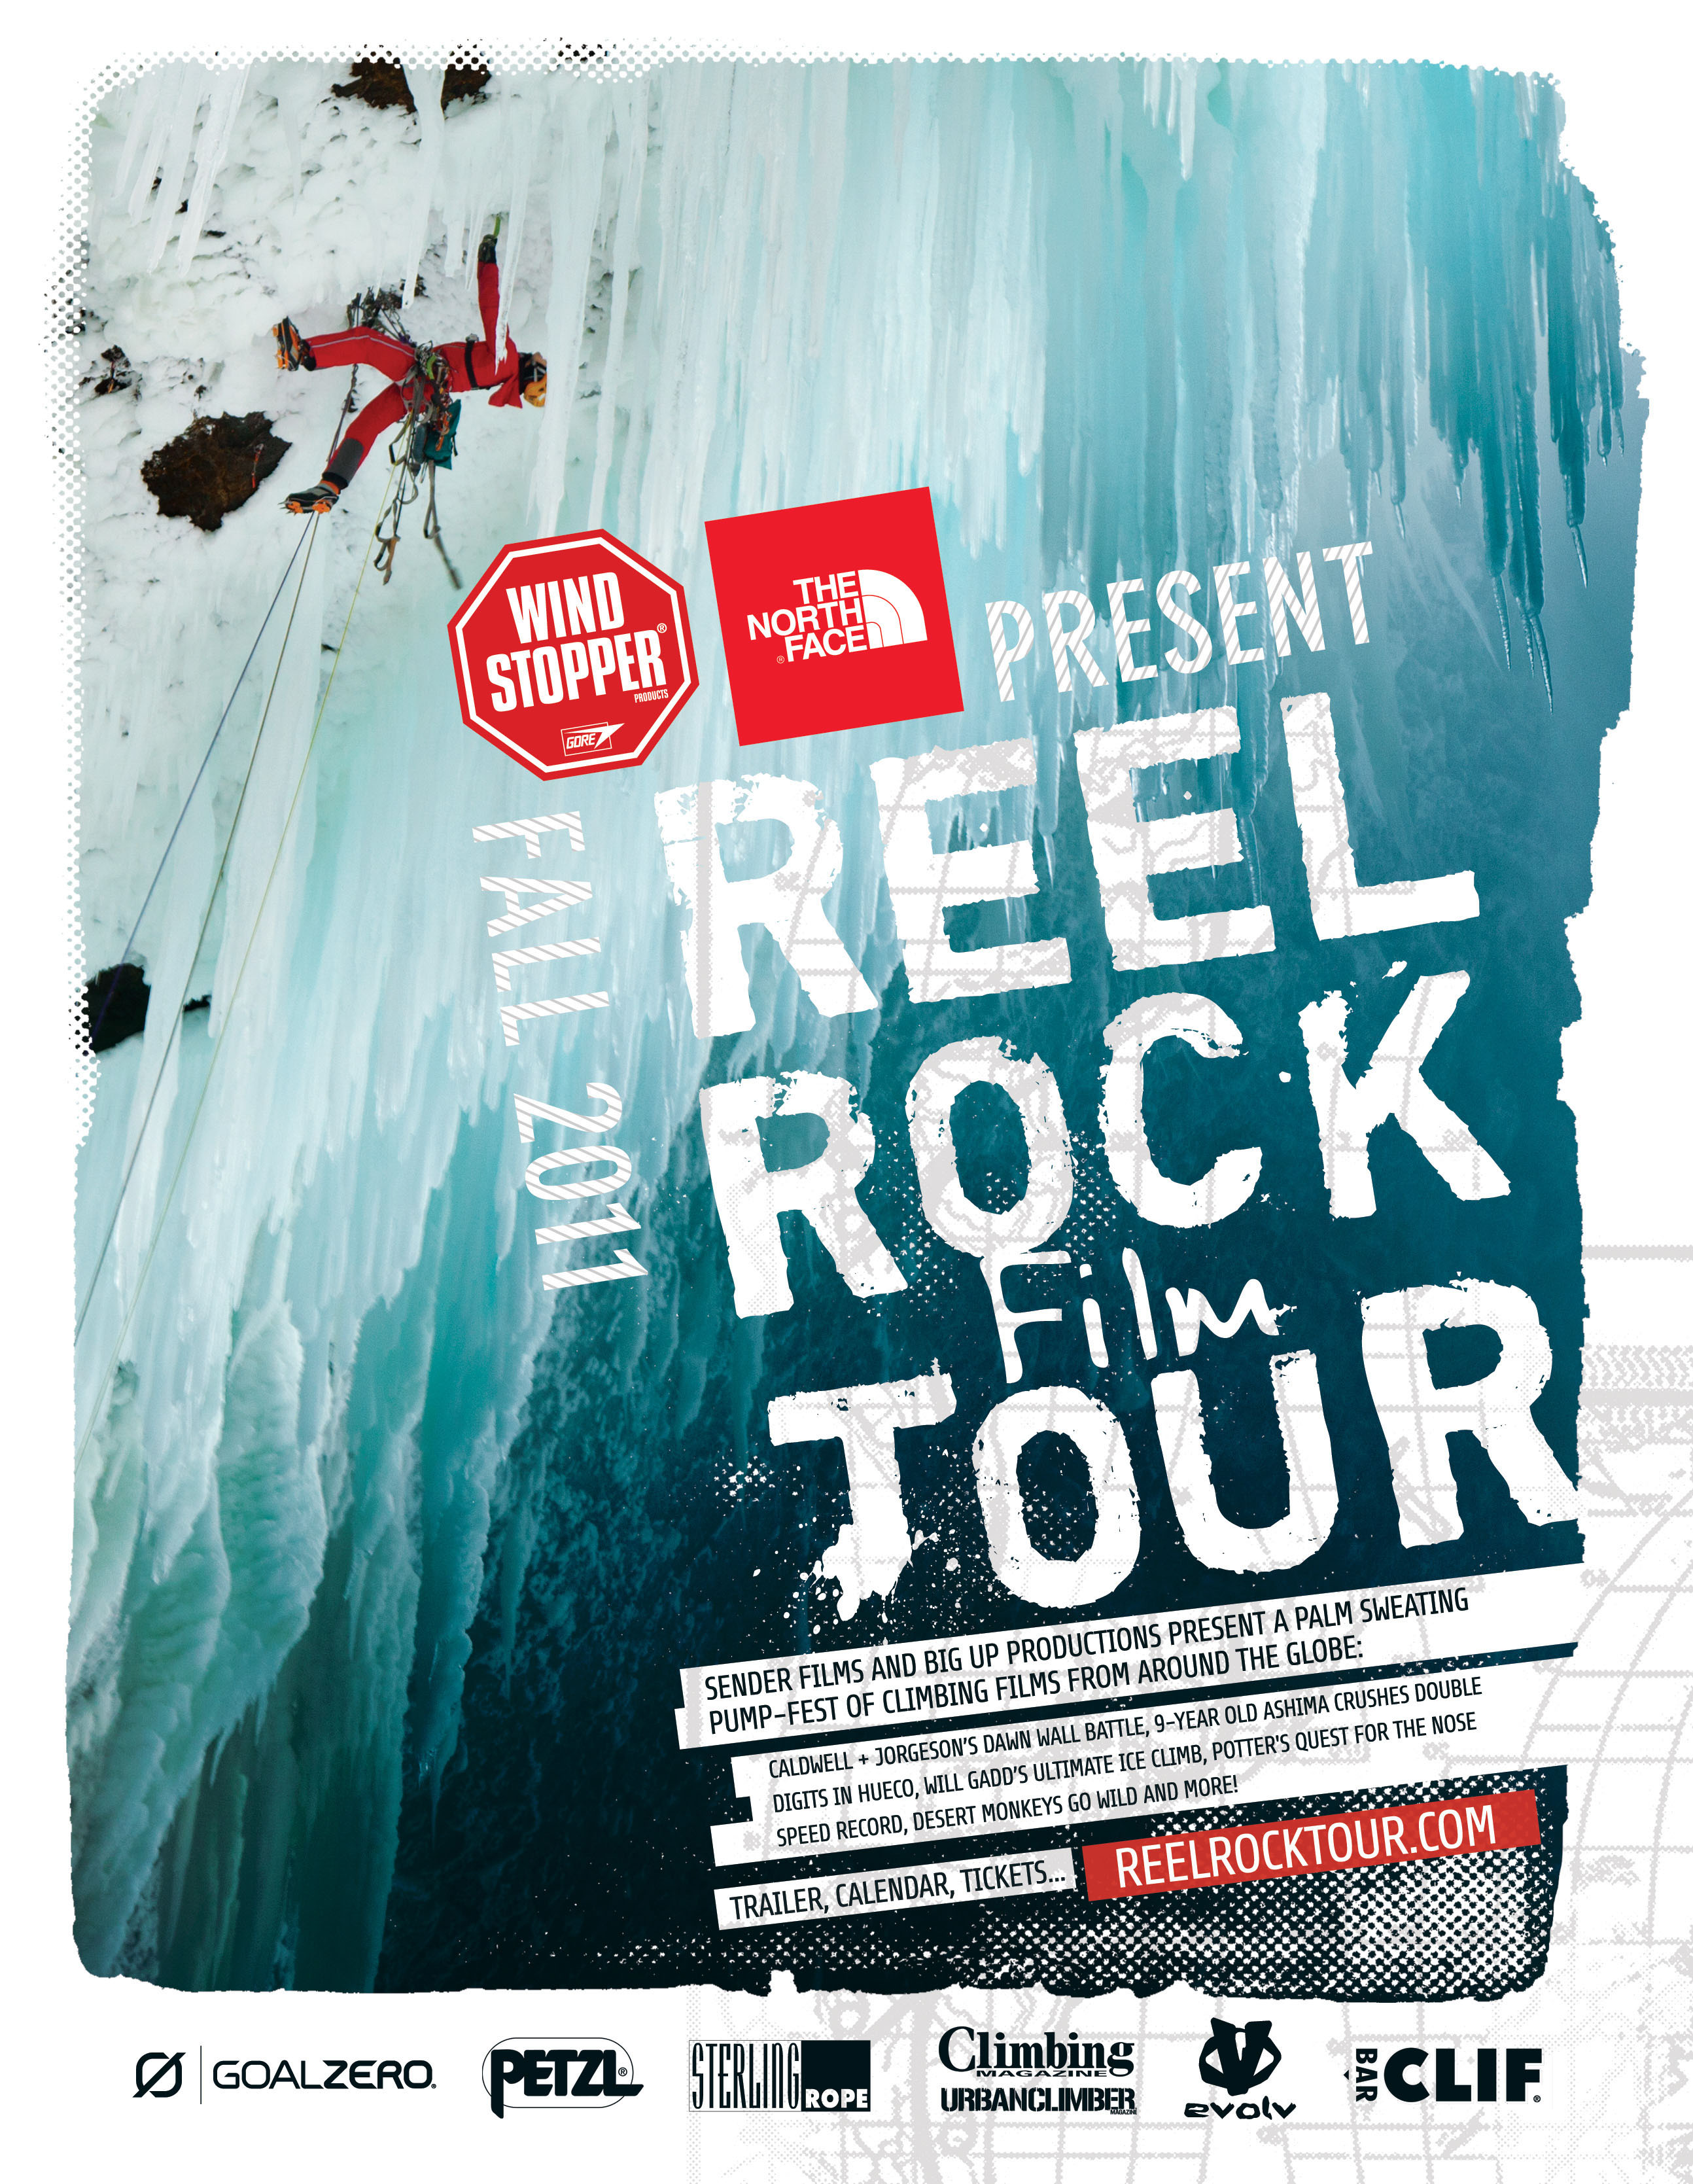
Reel Rock 6 seems to include lots of stuff related to alpine stuff. It starts with Will Gadd's and Tim Emmett's exploits on wildly overhanging spray ice in Canada's Helmcken Falls, followed by a shortened version of Cold , featuring a winter ascent of Karakoram's Gasherbrum 2. After that the film moves to rock climbing. Most of this in this film's case take place on the big walls of Yosemite. The film is available as HD download.

Moonflower Is another interesting looking new video. It details the climb "Cartwright Connection"Mount Hunter4442mAK4+/nccs IV AI3 5.8; V/AI3/70°, 5.8,A32440m, 7-10 days on route on Mount Hunter's Moonflower Buttress by Britons Jon Bracey and Matt Helliker. For more info, see British Moonflower Buttress Expedition 2011 or Cartwright Connection.

To be or not to be?

By doing some research for climbs in the Cordillera Blanca and Huayhuash, as well as back when I was doing the same for Langtang Himal of Nepal, I tumbled across whole range inconsistency of issues. These make even identifying the peak a tad difficult and therefore complicate finding further information a great deal.

These issues include things like:

  • inconsistent naming of Peaks
  • inconsistent writing form of the same sames
  • inconsistent altitude

Identifying the route has also the very same issues with naming. Also those and sometimes vague details about the route make it difficult to identify the same route. If first ascentionist information is available, it can make this a lot easier. It is not free of pitfalls though, as there appear to have been few ascents reported as new route when the route had actually been climbed before. Listed first ascencionists can also be inconsistent between sources if one source lists a route as climbed without summiting whereas another source considers the first ascent that ends up on a summit as the first ascent. In Peruvian Cordilleras several routes end on a summit ridge without actually summiting.

Jeremy Frimer's excellent guidebook Climbs & treks in the Cordillera Huayhuash.Frimer, JeremyElaho2005The pre-eminent guide to one of the world’s great mountain ranges, detailing the approaches, the treks, the climbs and travel. 09733035570973303557FrimerGuidebooken lists references to sources he considers to be primary. While this approach is very much common place (usually mandatory) in scientific world, I don't remember having seen it used in climbing world too often. Makes perfect sense though.

Sources of information I consider primary within the realm of climbing world (in descending order of importance, IMO):

  • guidebooks
  • Alpine journals (I consider Alpinist and Mountain Info to be somewhere between a journal and a magazine in this respect and Himalayan Index to be journal of sorts)
  • climbing magazines

Some of these are available either completely or at least partially online:

Another point that I have sometimes wondered is that in some areas there are very few repeats and virtually all ascents are called new routes. Sometimes this appears to be caused by practically every variation to an existing route to be considered a new route. And variations on mountain routes are pretty much the norm either intentionally (due to conditions) or unintentionally (getting lost). Obviously there are no stead-fast rules when a route is a route and when it is a variation. This is brought up in an The Changing Nature of Climbing of Alpinist.

Yet another point to consider is what constitutes a mountain. In Europe, most notably in Chamonix area, there are apparently not a bumb small enough not to be a mountain with name and everything. In less explored areas, say Himalayas or Andes, what is considered to be a mountain is usually very different. In those areas I suspect that the whole range of peaks making up the mountains of Chamonix could be just one mountain, with Aguille Verte, Grandes Jorasses etc called Mont Blanc Norte I and II respectively. At the very least, Mont Blanc du Tacul, Mont Maudit, Mont Blanc du Courmayer and other satellites would most definitely not to be counted as mountains, some of them probably not even as side summits. Not that there's anything wrong with them being counted as mountains, if they weren't it would certainly make reading guidebook more confusing due the great number of routes on various features on Mont Blanc and its satellites. If going to less explored areas though, it is worth a note that up there something called say North summit may actually be very much independent peak.

Also just because a peak doesn't even have a proper name but is referred to group name and a number (say Caraz II or K7) doesn't mean that it wouldn't be imposing peak on its own right.

Then there are mountains that have highly misleading name. Take Yerypajá Chico as an example (peak sitting on Cordillera Huayhuash main chain between Yerupajá in the south and Jirishanca in the north). The name would suggest a lower side summit to Yerupajá. However, a peak with a primary factor (altitude gain from low point separating it from its nearest higher neighbor) of over 500m is hardly a side summit of anything.

Scanning & stitching maps

Outdoor maps tend to be too large to be easy to use when climbing (or trekking for that matter). Copying or scanning & printing smaller portions of maps is often a good idea to create a map that is easier to manage. This can also save some money, as you are less likely to tear or otherwise destroy the original map.

Copying parts you actually need is obviously simple enough, but there are times where scanning is useful (particularly if you want to add route lines, campsites etc. on a map beforehand. However, scanning large format map raises few issues:

  • unless you have access to large format scanner, scanning in parts & stitching the pieces is required
  • folds and wrinkles are as good as certain to cause distortions. It is also virtually impossible to get the map to be completely flat on a scanner, which causes more distortions. And finally, scanners, particularly inexpensive ones, can add distortions of their own.

The best way (here: best equals the method that produces the best results, not the method where you might get acceptable results with least amount of time and effort) to scan maps for stitching I have come up with is the following (warning: the process is labor intensive; so if you can get the map in digital format, do yourself a favor and get it to save a lot of hassle).

  1. Get the map as flat on the scanner as possible. This can often be achieved removing the lid and placing heavy book above the map.
  2. Scan each piece normally. usually it's a good idea to leave edges unscanned, as they are almost certainly not completely flat causing bot distortion and darkness.
  3. Despite all the efforts described above to avoid distortions, there are some, trust me. Distortions are particularly bad for stitching as they are sure to cause disalignment on the part edges. The way to fight this is to:
    • create a grid and distort scanned image back to the size and shape it should have been. In the case of maps there are usually gridlines. The idea here is to create grid using image manipulation applications guidelines tool so that the grid size is exactly as it should be on paper map.
    • then load each of scanned images as new layer in image processing app and force it back to shape by distorting it so that the grids on map align perfectly with grid created above with guidelines. This also takes care of deskewing the scanned image (it is virtually impossible to scan large format originals with smaller format scanner without the scan to be a bit rotated).

Obviously one could try to be lazy and use stitching application for the same purpose and thus save a lot of manual labor. However, I have found that they usually do a bad job of stitching maps. No reason not to give it a go though.

One Crampon to rule them all, part deux

With Black Diamond about to introduce their new BD StingerBDStinger, it seems quite possible that Petzl might steal their thunder with all new Petzl LynxPetzlLynx. On paper it looks much like Petzl DartPetzlDart, just with proper downward points and heaps of adjustment possibilities. All this without too bad of a weight penalty. Interesting indeed.

Blessing in disguise

I broke the metal strap that is used to attach retention strap from the front bail of my Grivel Rambo 4GrivelRambo 4 's. It seems that this might have been a blessing in disguise as it made me do some comparisons of the front bails (I have few other Grivel crampons laying around (Grivel G14GrivelG14 's, my brother's old Rambo 2's).

I replaced the whole front bail with the one from mono-point set of Rambo 2. By doing this I noticed that the bail of Rambo 2 fits better with my Scarpa Phantom Guide's. It is not asymmetrical like Rambo 4 one, but this doesn't seem to matter. The difference is that the bail is narrower, thus eliminating the possibility of horizontal movement almost completely. The front bail is slightly longer though, so I ended up moving the front bail one step further back. This effectively moved the boot backwards half a step.

After noticing this, I compared the front bail of G14 and Rambo 4. Rambo 4 bail is significantly shorter, a bit narrower and asymmetrical in shape. By using slight violence I was able to fit Rambo bail on my G14. This moves the boot backwards quite a bit, which causes two changes:

  • front point gets effectively longer (which is otherwise significantly shorter than on Rambo 4)
  • secondary points and small additional points move significantly towards front giving them a much better possibility to actually hit the ice

I am generally not a big fan of very long front point (added leverage equals added strain for calves). However there's such a thing as too short. This new setup looks much better than the original one so I obviously need to give it a go to test whether this translates to better real-world performance.

While I was at it, I also tried out my new DremelDremel by sharpening pathetically dull secondary points.

Vimeo finds

No pain, no gain

Ice and mixed climbing require highly specific set of skills, that are not too easily gained by doing anything else. And yes, this includes rock and gym climbing too. Furthermore, the game is largely within the head. Best way to improve your confidence in ice climbing is to ice climb. Failing that, drytooling and rock climbing and even indoor climbing can all help.

However, when none of these are an option due to accessibility or time constraint, there are quite a few exercises that can be performed at home with not much equipment and that don't take too much time to complete.

Swinging. Take ice tool and duct tape some weight to head (say two cans of beer). Then start doing swings (aim for precise swinging that matches actual ice climbing swings). Depending on your fitness, weight and swinging speed, 40-60 repetitions per hand and a set should make the hand properly pumped. If it doesn't increase the weight. Repeat three to four sets per hand.

Calves. Bog-standard toe raise, either each calf separately or both at once. Or mix and match. Repeat between 40-60 times. If it doesn't start to burn your calves properly, either put your toes on a platform or put a backpack on.

If you have a pull up bar, there are lots of possibilities. For variety and added specifiness you can use the bar, hang from it from your tools or attach rock rings to bar. Of course there are the classics:

  • dead hang
  • one handed dead hang
  • pull up (normal, staggered)
They all work just fine and are beneficial. That being said, I have tried to come up with ones that more closely mimic actual climbing motion in hopes of them being even more effective. So I have come up with these two exercices:

combination exercise consisting of

  • pull up - lock off combo (repeat until properly pumped or until you can't do a pull up anymore)
    • dead hang for about five seconds
    • pull up
    • lock off for roughly five seconds either at top position or lowering my arms to 90 degree angle
  • to allow me to stay on, I place my feet on a bad support (small climbing hold bolted on wall in my case) to take some off the weight off my hands (not too much) and allow to shake out
  • keeping my feet on the support, few repetitions of a pull up, lock off and reaching higher with another hand (as in reaching for the next hold)
  • another shake out
  • few repetitions of dead hang and shake out placing feet on support
  • finish with dead hang until the pain becomes unbearable. Alternatively just hang while keep feet on a bad support (easier, thus allows for more duration).
This combination exercise should take few minutes to complete thus it is good for endurance, not just pure strength. I believe it mimics the actual climbing pretty closely.

Another simple exercise I find effective is to do a lock off (in 90 degree angle) while raising my feet (curled up) towards chest and keeping them there. This puts a load both on arms and core. This can very well be be combined with pullups by doing a pull up, keeping the lock off & feet raise for a few seconds, then repeating as many times you can.

Step up. Build a two or three step ladder, put a backpack on and start stepping. Unlike StairmasterStairmaster, this does not cost much, does not make much sound and doesn't take too much space. You don't have to use time to get to the training and you can train no matter of the weather. Obviosuly this is monotonic, but this can be aided by doing it in the living room watching tv or listening to music. Height of the steps and weight of the backpack obviously make a great difference in how strenuous this is. I use this exercise mainly for aerobic endurance, so I usually do this for an hour non-stop, changing the "leading" foot every five minutes. Mimics walking uphill with a backpack far better than, say, running, cross country skiing or mountain biking, although this certainly isn't as much fun. Trains both general aerobic endurance as well as uphill specific muscles of you feet. Add toe-raising on top step to make it harder.

Remote Exposure

Licensed under: cover photo.

There's a interesting looking book coming in a form of . It promises to give loads of useful info regarding the climbing photography.

Though many hikers and climbers carry cameras with them, they often come away feeling disappointed because their images fail to visually translate their experiences. In Remote Exposure Alexandre Buisse goes beyond the mere basics of photography and gives you the tools needed to create images that are not only of good technical quality but that are compelling as well.

This book will guide you through the various options for equipment, since the requirement for lightweight gear that is able to withstand cold, adverse weather conditions presents unique challenges. Learn about the importance of having an efficient carrying system and a logical, planned workflow.

Throughout the book you will find advice on where to point your camera and how to compose a strong image. Included are specific requirements for rock climbing, hiking, mountaineering, and camping. More advanced photographic topics are also covered such as digital capture and optimization techniques like high dynamic range imaging (HDRI), panoramic stitching, and how to achieve excellent results without a tripod.

The pages are filled with over 100 stunning images captured by Buisse as he hiked and climbed through mountain ranges on three continents. Photographers of all levels and those who just appreciate beautiful images are sure to be inspired by this book.

I also figured that it wouldn't hurt to brush up my self rescue skills. For this reason, I ordered Climbing Self Rescue: Improvising Solutions for Serious Situations.Tyson, Andy & Loomis, MollyMountaineers Books2006When your climbing team is in trouble on the mountain—how to get yourself out of a jam without calling 911. - Self-rescue procedures for teams of two—the most common climbing party size - Techniques equally effective on rock, snow, and ice - Utilizes gear climbers already carry in their rack - Includes 40 one-page rescue scenarios and solutions for analysis The rope is stuck—or too short. A crucial piece of gear is MIA. You’ve wandered off route into dicey terrain. An injury leaves you or your partner in need of help. Climb long enough and finding yourself in a jam far from help is inevitable. In Climbing: Self Rescue, two longtime climbing instructors and guides teach how to improvise your own solutions, calling for outside help only when necessary.Because few climbers carry fancy (and expensive) search and rescue gear, all skills taught in this book use the items typically found on a climbing rack: rope, carabiners, slings, and cord. Text, illustrations, and photos explain knots, belaying and hauling systems, rappelling, ascension, passing knots, how to safely assist and rig an injured climber, and more. Roughly half of the book is devoted to real-life climbing scenarios and solutions ranging from moderate to severe. Because real-life situations rarely unfold as they do in practice, Climbing Self-Rescue teaches how to analyze and improvise your way out of a crisis.ANDY TYSON is a guide for Alpine Ascents, Exum and Antarctic-logistics and Expeditions. MOLLY LOOMIS is an instructor for the National Outdoor Leadership School (NOLS), Alpine Ascents and Prescott College. Tyson is the author of Glacier Mountaineering; Loomis has written for Rock & Ice, Climbing, She Sends, and other publications.978-0898867725978-0898867725Self RescueInstructionalen.

One Crampon to rule 'em all

Front part of Grivel Rambo 4. I really like the front point configuration with additional point outside the frontpoint, secondary points facing forward and outward and back points facing backwards and somewhat out. If I were to nitpick, I'd like the secondary points to protrude forward more aggressively (that is to say a tad more forward) and the underside of them could have small teeth for better traction on rock. However, my biggest grief on Rambo's is the weight and lack of sensitivity. Also, flat and rigid structure makes the front part not to fit too greatly on shoes with rocker soles. Credit: Grivel, Licensed under: Public Domain.

I have climbed last few years mainly on Grivel Rambo 4GrivelRambo 4 on ice falls and Grivel G14GrivelG14 on alpine stuff. Rambo 4 works fine, but it is heavy and due to vertical structure, it doesn't give as good a sensitivity as I would like. This is particularly not ideal on mixed ground and thin ice. Furthermore, it is by far the worst crampon I've ever used to walk on, due to height and point structure. So I think I am going to need to try lighter weight crampons.

I do my drytooling and mixed climbing on fruitboots (older model of La Sportiva Mega IceLa SportivaMega Ice with permanently attached Grivel RacingGrivelRacing crampons). Obviously this combo as far lighter and more sensitive than anything you could realistically expect from any combination of more traditional boot - crampon combo. However, keeping the sensitivity of the fruitboots as a benchmark, my current go-to crampon for ice falls (Grivel Rambo 4) leave a lot to be desired.

Some features I think are important:

  • Fit. Good fit consists of multiple things, starting from the general shape. In my case that is a curved frame to fit curved shoes (Scarpa Phantom GuideScarpaPhantom Guide 's in my case). Some other features affecting the fit
    • front bail must not be too wide to prevent sideways movement
    • back lever must not be too tall so that it does not press ankle painfully (particularly important of softer boots)
    • back lever should have a proper retention strap to prevent accidental opening (could be an issue when hooking). Petzl lever has strap on the bottom, which is a very bad design in my book. Both Grivel and BD place the trap to the top of the lever, which make accidental opening of the lever as good as impossible. Luckily, it is possible to fix the issue with Petzl lever by either replacing the lever with BD or Grivel one, or by tinkering with the stock lever.
  • Offset monopoint. I have read that some prefer dual points for pure ice. I wholeheartedly disagree. Proponents of dual point usually list more support as benefits for dual points. I don't really buy this arguments. Granted, if you have dual points planted all the way into ice, they would be more supportive than mono point. The problem with this argument is that it is virtually impossible to get dual points planted as well as a mono point. The problem is that when the ice is hard, you usually can't get duals fully in due to added resistance. Duals are also more prone to shatter the ice. Monos on the other hand can be readily placed into your pick holes. Furthermore, monos are far easier to plant on featured ice, not to mention on mixed ground (not a really a contest here). Also, I have found out that duals tend to pop out if you boot twists slightly. This is a common occurrence, at least on my case, when pulling over bulges.
  • The point of support is very important though. To boost the support of dual, the secondary points need to placed far enough towards the front. This is a problem with most crampons on sale. Particularly, secondary points of G14 are placed too far back and protrude to little forwards to allow proper support. On Rambo 4 secondary points are better, but they still be placed a bit further forwards. Many models have small teeth facing forward outside the mono. I believe Grivel got this one right with Rambo 4, which has a smaller point about on the position where there would be outside front point on dual points. This is longer than on most crampons for added supports but not too long to cause the same issues as duals do. Pretty much the best of both worlds in my book. I also like the secondary points to angle outside for better hooking and for kicking a ledge to give a welcome rest for calf muscles when placing a screw.
  • For hooking performance, points angling out and back are beneficial. This is another part that I really like on Rambo 4.
  • Replaceable front point is a benefit, hands down. That being said, secondary points are very important as well. Therefore, I don't see having to replace the whole front part (like is the case with Petzl DartPetzlDart and Grivel G20GrivelG20) as a problem, if spare front parts are actually available and the price isn't too astronomical.

So all in all, Rambo 4 point configuration on flat crampon would be pretty close to my ideal.

Petzl Dart. In many ways a polar opposite of Grivel Rambo 4. Very light and reportedly highly sensitive due to horizontal and minimal frame. Configuration of secondary points seems very good, although it has no smaller additional point between frontpoint and outside secondary point. Furthermore, secondary points could benefir from being a tad longer and facing outwards. Also, points facing backwards woulkd work better for hooking if they were polaced further to the back (or maybe those backmost orange points could have similar shape than the back part of secondary point). Credit: Petzl promo photo, Licensed under: Public Domain.

Of the crampons available on the market, Petzl Dart, Grivel G20 and upcoming BD StingerBDStinger seem to be the closest thing to those ideals, although none of these are perfects. Biggest issue with the upcoming BD Stinger (based on articles about the test samples) is the configuration of the small points between front point and secondary points. These seem to be located too close to front point and the outer one could be longer. This setup is rumored to change before production crampons hit the shelves, so there's hoping BD will fit the bill pretty closely. Particularly if they have fixed the front bail (far too wide in their previous crampons).

Screw 'em up

I've had my ice screws sharpened a few times by Grivel sharpening machineGrivelsharpening machine. The screws after the sharpening machine seem a bit rough, but they do work fine, despite them usually looking a bit rough. Bursts need to be removed with a file, but other than that they have worked just fine.

However, the machine seems to just take off the material from the cutting edge, which means that the valleys between the teeth tend to get shallower.

Sharpening the screws with a file could produce the screws with more new-like shape, but sharpening the screws with a file takes a lot of filing, as the teeth need to be equally long. Which often means that you have to make all other teeth dull at first, then reshape all of them. This is rather labour-intensive and it is also easy to screw the angles up, which could produce fine looking screws with pathetic performance. However, I've seen some screws sharpened with a DremelDremel machine, which shaves off significant amount of time. Given that we have no Grivel machine available anywhere near where I live, I believe I need to give this a go. Keep in my that machine sharpening the screws is directly prohibited by screw manufacturers as it can overheat the screws, therefore ruining the tempering (read making the screw get dull and/or bend easier).

History